Monday, February 20, 2012
Lesson Plan for Max Ernst-Inspired Collages
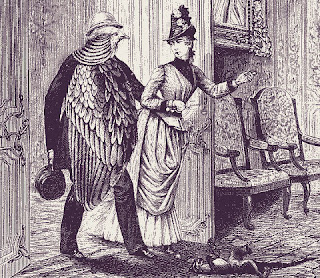
The above image is by Max Ernst from his book titled "A Week of Kindness."
Grades 4 to adult
Time Frame: 2 art periods
This project is inspired by collages by the Surrealist Max Ernst.
Aims:
•To explore the collage process
*To use old illustrations to create impossible scenes
*To create individual works that express absurdity, nightmares, the occult, etc.
*To be exposed to the Dada/Surrealist collages fo Ernst
Materials: Black paper or backgrounds from collected sources, copied, old illustrations from 19th Century books and ads copied, scissors, glue sticks, old phone books or magazines for gluing
Vocabulary: Dada, Surrealism, collage, overlapping, edge
Procedure: Give students pages of images to choose from. Students will make either their own backgrounds or start with one from your collection of images. (Ask me for a packet of originals to copy, if you are interested.) Show good cutting technique, by making clean edged cuts. Have your students move the paper, not their wrists! Show how to plan by working from the back forward. Demonstrate good gluing technique by putting your shape upside down on a page of the phone book and gluing around the edges of the shape. (The middle takes care of itself!) Smack down for a tight, clean bond and throw the page of the phone book away. Repeat for each shape. This way, no glue gets on the table and you get clean gluing.
Reflection/Follow-up: Share the work. Perhaps you can make a class quilt with one work by each student being put together in rows.
Friday, February 3, 2012
Updates
We have ordered the textbooks. I'm not sure how long it will take to get them in, so you may want to buy the book at Amazon, anyway. I leave it up to you. I will copy the first two chapters for those of you unable to get the book. Sorry about this.
I am clarifying the assessment piece of our class and should have everything in place for you by next week. You will have a guest professor on 2/29 and you may want to plan on attending the National Art Education Association conference which is in New York City this year. It's a great way to network, find out about what's going on in the art education world, get free glom and hear both Prof. Zwirn and myself speak as presenters. I'm not sure what her topics are this year, but mine is on Thursday and it's called "New Dimensions ins Teaching Advanced Drawing to High School Students."
Exquisite Corpse Group Project-Lesson Plan
This project is a fantastic way to begin a school year and create a sense of pride in students who have not yet become a “group.” The results are easily hung high up, along the top of school walls (depending on fire regulations).
Aims:
To create individual oil pastels pieces which will fit together
To learn about the surrealist party game of the same name
To create a group dynamic, where each student is a part of a larger, greater, whole
Materials & Tools: Pre-marked construction paper*, oil pastels or some other medium like pastels or construction crayons, scissors
*To make the marks you need to know how many students will be involved. There are ways to add more pieces but it is hard to take them away without messing the finished product up.
Lay out the pieces in a row--you can do a few at a time--from left to right. Draw short lines across the two papers, enough to be seen. I vary where I put them to make the end result more interesting-looking. Write the number and draw an arrow on the back side under the topmost line (see illustration). This is super-important so you know the proper placement. If your students follow the directions, when they cut out their pieces, the numbers on the back will stay intact for easy taping together.
Motivation: If you want to show examples of actual exquisite corpses, be mindful that a few of them are rather explicit, so you’ll have to look at what you choose ahead of time. The idea is that you draw something and that it will connect perfectly with the drawing in front of yours and the one behind. It forms a cohesive whole only after the pieces are assembled.
You may also want to have picture library pictures of animal patterns and other images that will stimulate interesting results.
Vocabulary: exquisite, corpse, blending, pattern, continuous
Procedure: After showing and/or talking about what an exquisite corpse was (and defining the nonsense title), explain that each student is going to make a separate piece that will fit together to make a larger project. Explain that one person will do the head, another will do the tail and everybody else will do an inside piece. You can ask for volunteers for the end pieces or randomly hand them out with the other pieces, depending on ow you want to approach it. The students doing the end pieces will only have two (not four) lines on their papers.
The rules are simple: the top two lines on the left and right side of the paper must eventually connect to each other and the bottom ones must also connect. What the line does in between them is what makes the shapes fun and unique. They can wobble, go up and down, have scales, wings, extra heads and feet, etc., as long as they eventually connect. The sides between the up and down lines must stay straight (and uncut) so they fit tightly to the next piece. The arrow on the back will help students work right side up.
Demonstrate good oil pastel use--layering and blending are encouraged. If the construction paper is blue, I tell them cover all the blue. You want to have rich patterns and details. Have them press down and use one color over another. I show them how to peel their oil pastels and that even “dirty” ones have rich, bright colors underneath. “Use them until they disappear,” I tell them.
When colored, they can cut them out. You may want to work with a few students at a time on this step to get it done right. If they miscut, you just tape it together on the back--no worries. Variation: leave the pieces intact and just tape the rectangles together.
If someone needs to start over, you need to make an exact replica of the original paper or it will not fit. If a new student comes in, find the middle of the project (say sheets 13 & 14), ask those students to lend you their papers and make a 13B sheet that fits between them, putting the number and arrow on the back as described above. Begin the project with exactly the number of students you will have that day. I often did almost enough sheets ahead of time and then made the last few as needed, based on attendance.
Tape together from the back and laminate, if feasible. I put pieces of tape horizontally at the top and bottom of the seams in between pieces for extra strength.
Reflection: Share the work, of course! The display of this project will cause create great excitement. I once did this with the entire sixth grade at a large school and wound up with a piece that practically covered the entire school foyer and hallways.
Follow-up: You can make vertical, very tall exquisite corpses based on rainforest trees (with flora and fauna) or just do art elements and keep them abstract. Animals as presented here are only one possibility of many. You can also vary the materials and work in watercolor, oil pastel resist, markers, etc.
Thursday, February 2, 2012
Textbook Was Not Ordered!!!!!
No one explained I had to put in for an order to the bookstore for the textbooks--last year they just appeared! I tried to call Prof. Zwirn to ask if we should order them this late but she hasn't called me back. So I say: use Amazon. I will post whatever Prof. Zwirn says when she gets back to me, but in the meantime, see if you can get
Art for Life elsewhere. Sorry about this. (I'm still kinda new here...)
Subscribe to:
Posts (Atom)